
Homewyse Lists
User Guide
New to Lists? Review the Getting Started Tutorial and the Lists User Guide.
Homewyse Lists User Guide
Explore the following topics and step-by-step instructions in sequence, or review relevant features as needed.
Uses of Lists
Lists is an application that helps service pros generate accurate, consistent and professional looking estimates for jobs commonly performed.
If you are service professional and offer a standard set of services, you can create a reusable List that represents these services and the costs factors associated with each service. When you are ready to create a specific job estimate, create a new List that is a copy of your reusable List, enter the job size and check the services for that job. Lists will automatically calculate the hours of labor required, labor costs and material costs from the job size you entered.
As a final step, Lists can be printed or output to an electronic PDF file which can be emailed or texted to the client.
Lists includes Templates for common trade conractor, service, and maintenance work. These Templates will typically need to be customized to the needs of each business. Customization options are summarized in the remaining sections of this guide.
How Lists Works
Homewyse Lists helps service professionals quickly prepare estimates of time, cost and materials for common jobs they perform.
Users create and (re)use Lists that summarize the service and product options they offer for commonly performed projects.
A List is simply an itemized collection of work tasks and materials. Information stored in the List is used to determine the quantities and costs of labor and material, based on the unique size and options for each job.
List users can easily modify, save and create customer ready estimates from these Lists. Because Lists is a web application, all of this can be done from ANY smartphone, tablet, laptop or desktop PC - without having to install or maintain standalone applications.
Getting started
As your first step, it is important that you review and fully understand the Homewyse Lists Getting Started video.
This introductory video explains the important applications and basic use of Homewyse Lists. You will learn about how Items are defined and used to calculate labor hours, material and cost estimates for a List. And you'll be shown how to start with a pre-defined Homewyse Template and then edit and customize you List as needed to fit your business.
Once you've finished viewing the tutorial video and understand how Lists works, click here to sign up for your free Lists Basic account. Remember to respond to the activation email (check your spam folder if you don't see an activation email in your inbox) prior to signing into Lists for the first time.
Sign into your homewyse account and try Lists with your business. The Basic level has most of the same features and all of the content in the Pro version - so you'll be able to determine if Lists is right for you.
Learn about all Lists features and options in the following sections of this guide - and/or view the Advanced List features tutorial.
After you've learned the Basic version and feel confident that Lists will work for your business, you may want consider the Pro level. The Pro level offers unlimited number of custom Lists, and print output customization features that allow you to streamline output files put your business logo and contact information in the print output.
Using Homewyse Lists Templates
To get the most out of Lists, you will need to build a List that contains your common service and product offerings. Once you build your List, think of it as your "master price list" that you can copy and reuse for each job you have. Although you can build your List from a blank List, it is usually easier to start from a Homewyse Template and modify that Template for your specific needs. Homewyse Templates are built for a specific trade or service area and offer common task and material options, pre-loaded with unit cost and unit effort estimates that are typical for current conditions.
Homewyse Lists has example Templates for the following service areas:
- Framing Carpentry
- Interior Painting
- Flooring
- Handyman
- Drywall
- Roofing
- Tile
- Decking
- Plumbing
- Electrical
- Landscaping
- Concrete
- Siding
- HVAC
- Kitchen Remodeling
- Bathroom Remodeling
- ...and more
To create your own List from a Template:
- Sign into Lists and choose Add new List
- Choose the Copy Homewyse Template option
- Choose a Template from the available Homewyse Templates
- In the Create New List dialog enter a Name for your copy of the Template
- Enter the List wage to be used to calculate labor costs for your List
- Choose Save
To use a List to generate an estimate:
- Enter a List quantity value in the upper right portion of the List. This will update all Item calculations (Item quantity, hours, and costs) for those Items that have been set up to calculate quantities from the List quantity
- Check the checkboxes to indicate a "check" next to Items that you want included in the estimate totals (and make sure that Items you don't want in the totals are "unchecked")
- Check the results and make adjustments (see Notes below) as needed
- Choose Save
Notes for Homewyse List Templates
- Item level changes: You can set any Item quantity to a fixed value OR have the Item quantity calculated from the List quantity. And -- after an Item quantity is adjusted to your satisfaction, you can change the factors that calculate the hours, labor cost and material cost for that Item. See how to change Item factors for more information
- List level changes: See how to change List factors to learn about setting a single labor wage for all List Items, and adjusting material and labor markups/discounts to achieve desired Totals
- Later sections of this guide explain how to add Library Items (predefined Items from the www.homewyse.com library) or add copies of your existing Items or a new customizable Item to a List
Changing List cost factors
Once a List has been created, there are 3 cost factors that can be applied to ALL Items in the List. These List level cost factors are explained below:
List Wage This factor allows you to: (i) change wages for EVERY EXISTING Item to a new value and/or (ii) set wages for Items that will be added to the List. This is useful when you reuse (or copy) a List based on wages that are out of date. To use this factor:
- Sign into Lists and open the List that you want to change
- Choose settings located to the right of the List name
- Enter the new List wage $/hr for your List
- Option: to apply this wage to all Items in the List (and replace all existing Item wages), check the appropriate box
- Option: to apply this wage to all future Items that will be added to this List, check the appropriate box
- Choose Save
Labor adjust This factor allows you to adjust all Labor costs simultaneously without changing Item wages. This can be used to quickly apply discounts or markups to all labor costs in a List.
- Sign into Lists and open the List that you want to change
- Select and move the Labor adjust slider to decrease or increase the Labor cost column. This will adjust all Item Labor costs (and Labor subtotal) by the same % amount
- Choose Save to store the final Labor adjustment
- Notes:
- Labor adjust will not change any of the other Item or List cost factors for labor.
- Set the Labor adjust slider to 0% to return the Labor cost calculations to their uncorrected value
Material adjust This factor allows you to adjust all Material costs simultaneously without changing Item unit costs. This can be used to quickly apply discounts or markups to all material costs in a List.
- Sign into Lists and open the List that you want to change
- Select and move the Material adjust slider to decrease or increase the Material cost column. This will adjust all Item Material costs (and Material subtotal) by the same %
- Choose Save to store the final Material adjustment
- Notes:
- Material adjust will not change any Item or List cost factors.
- Set the Material adjust slider to 0% to return the Material cost calculations to their uncorrected value
Changing Item cost factors
If you need to adjust any values for an Item in your List, it is very important that you verify and then adjust Item values in the following order: Item Quantity > Item Hours > Labor Cost > Material Cost. The factors that adjust these value is explained in following:
Item Quantity This value is used to calculate all other values, so it is important to adjust this value (if you need to change the current value) before changing other values. The Item Quantity is either: (i) set to a specific value that you enter OR (ii) calculated from the List Quantity. If you want to change the Item Quantity:
- Open the List that contains the Item that you want to change
- Choose edit located to the right of the Item name that you want to change
- If you want to change the Item Quantity to a new fixed value: enter the fixed value in the User specified quantity field AND ALSO enter "0" in the Automatically calculated quantity field
- If you want the Item Quantity to be calculated from the List Quantity (and to change the factor used to calculate the Item Quantity): enter the "0" in the User specified quantity field AND ALSO enter the value of desired Item Quantity per List Quantity in the Automatically calculated quantity field.
For example if you want the Item Quantity to be one-half of the List Quantity enter 0.5 in in the Automatically calculated quantity field. Or... if you want the Item Quantity to be double the List Quantity enter 2.0 in in the Automatically calculated quantity field - Choose Save
Labor Hours (Hrs) If you are satisfied with the Item Quantity, but want to change the Item Labor Hours:
- Open the List that contains the Item that you want to change
- Choose edit located to the right of the Item name that you want to change
- In the Costs tab Enter a Labor production value which is the Item Quantity that can be produced in one hour. For example, if you can complete 3 Items per hour, enter the value "3"; if it takes 2 hours to complete 1 Item, then enter the value "0.5" (0.5 = 1/2)
- Choose Save
Labor Cost If you are satisfied with the Item Quantity and Labor Hours, but want to change the Item Labor Cost:
- Open the List that contains the Item that you want to change
- Choose edit located to the right of the Item name that you want to change
- In the Costs tab Enter a Item wage which is the total cost per hour for labor
- Choose Save
Material Cost Once you are satisfied with the Item Quantity, but want to change the Item Material Cost:
- Open the List that contains the Item that you want to change
- Choose edit located to the right of the Item name that you want to change
- In the Costs tab Enter a Unit cost value which is the total (non-labor) cost per unit of Item Quantity.
- Choose Save
Item Edit Notes
- Item level edits only affect the specific Item that has been edited once the Item is saved. Previous or future copies of the same Item will NOT be changed.
Reordering List Items
Templates and List Items are typically pre-ordered in the sequence the work is performed. This is usually acceptable, but there are situations where you may want to reorder the Items in a List. This is straightforward, but it is important that you remember to Save the List after you've finished reodering.
To change the Item order (position) of a List:
- Open the List to be reordered
- Click and hold (mouse input) or Press and hold (touch input) the Item name of the Item to be moved
- While holding and moving (dragging) the Item to its new position, a light blue background will highlight the Item being moved and valid location options will "preview" as you pass over those locations
- When the Item is shown over the desired location, "drop" (release) the Item
- Repeat with other Items as desired
- IMPORTANT: Choose Save when you are satisfied with the Item order
Notes
- You MUST choose Save after the ordering the Items to preserve the new List order when Printing or the next time you open the List
Add Homewyse Items to a List
Fine tuning your List typically involves adding Items to your List. Don't worry - adding Items is simple and easy to understand. First, note that three Item types can be added to a List: a blank Item; a copy of an existing Item; and a Homewyse Library Item. This section explains how to add Homewyse Items (the remaining Item additions are described in next section).
Homewyse Items are predefined Items that represent a majority of the basic tasks and materials found in the calculators at https://www.homewyse.com/services.html. The Library of Homewyse Items contains over 900 Items spanning a wide range of jobs in electrical, plumbing, carpentry and all other service trades. Each Homewyse Item has predefined values for the Item description, basis, labor productivity and unit cost. These values represent typical, average values in the current US market. Adding these Homewyse Items to a List is simple:
- Open the List open the List that you want to add the Item to
- Choose Add Item(s) to this List located just above the List Subtotals area
- Choose Homewyse Library Item
- Select an Item from the List after browsing through the List categories or using the Search by name option
- Choose Save
Homewyse Items Notes
- To edit your Homewyse Item, see Changing Item factors
- If you want to add the complete set of related Homewyse Item options contained in a Homewyse.com webpage calculator, see Adding Homewyse.com calculators
Add Items to a List
This section explains how to add blank Items and copies of existing Items to a List. See the preceding section for an explanation of how to add prebuilt Items from the 900+ element Homewyse Item library
For a blank Item:
- Open the List that will contain the new Item
- Choose Add Item(s) to this List located just above the List Subtotals area
- Choose Custom Item
- Enter the required information in the Basic area, then choose Next
- Enter the Item cost values in the Costs area, then choose Next
- Enter the Item quantity specification (either fixed OR calculated from List Quantity) Quantity area, then choose Save
To create a copy of an existing Item:
- Open the List that will contain the new Item
- Choose Add Item(s) to this List located just above the List Subtotals area
- Choose [YourUserName] Item
- Coose Save
Adding Item Notes
- Item value calculations (Item Quantity, Item Hours, Item Labor Cost, Item Material Cost) are explained in detail here
- To edit your Homewyse Item, see Changing Item factors. Note that you can make these edits before OR after you Save the new Item
- When you create an Item copy, the copy you create is completely independent of the original Item. Any edits to either Item will be isolated to the edited Item.
Delete an Item
To permanently delete an Item:
- Open the List that contains the Item to be deleted
- Choose edit located to the right of the Item name
- Choose the Delete button
- When prompted, confirm Delete
Notes
- Item deletion is final and cannot be undone
- When you delete an Item that was copied, only the Item you deleted is removed. Any other copies will remain unchanged.
Create or copy a List
There are 3 ways to create a new List: Copy an existing List; Copy a Homewyse Template; and Create a blank List. Each of these is described below:
To create a copy of a Homewyse Template (these templates combine common trade specific Items in one List and are 100% customizable after they are created):
- Choose Lists from the main menu
- Choose Add new List
- Choose Copy Homewyse Template
- Select a Template from the List
- Enter a descriptive Name for your new List and set a List wage
- Choose Save
To create a copy of another List:
- Choose Lists from the main menu
- Choose Add new List
- Choose Copy [YourUsername] Template
- Select a List to copy
- Enter a descriptive Name for your new List and set a List wage
- Choose Save
To create a blank List:
- Choose Lists from the main menu
- Choose Add new List
- Choose Create blank List
- Enter the required values (Name, List wage and Basis) then choose Save
- Notes:
- The List Basis is the "measurement unit" that you choose to specify the SIZE of project (example: for painting, tile or sheetrock work the Basis may the actual surface area to be completed OR the floor area of rooms for this work; for trim carpentry, the Basis could be the length of molding installed OR the floor area of the rooms to be trimmed out, etc.)
- The List Name and Basis are required for new Lists and cannot be changed once Saved
- If you want a different name for an existing List, create a copy of the List (see preceding section) with the desired Name and delete the original List
Delete a List
To permanently delete a List:
- Open the List that contains the Item to be deleted
- Choose settings located to the right of the List name
- Choose the Delete button
- When prompted, confirm Delete
Notes
- List deletion is final and cannot be undone
Printing
Once you have created a List, getting quality printed output is a few simple steps away:
- Open the List open the List that you want to print. Verify that the List quantity and other values look reasonable to you
- Check Items "check" the Items to be included in the printed output. "Uncheck" Items that you do not want included
- Save List choice and values choose the Save button
- Print choose the Print button. This will display your browser's print options for devices and formatting. Make any changes that you want and then choose OK to print your List.
Printing Notes
- To create PDF files from your List, review the Create PDF output section
- If you want printed List pages to contain your business contact information, your logo and any job specific notes, see the Add logo and business ID section
- To control which cost details are shown in the output, see the Print Options section.
Change Print Output
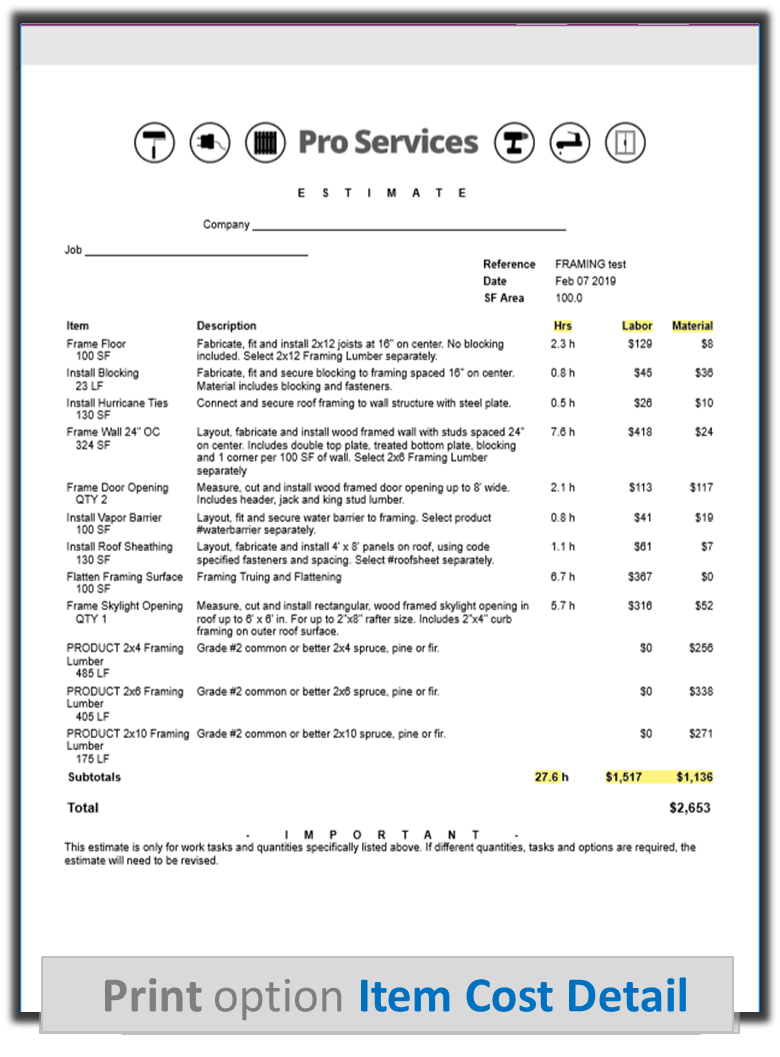
The basic output from Print includes all estimated details for each selected Item: hours, labor cost and material cost. This information matches the information that you see when working with the List. The Print Output options let you control which of this Item level information is included in the Print output.
To access and use Print Output options:
- Open the List that you want to print. Make sure that all Items to be included in the printed output have been checked and saved
- Choose Print
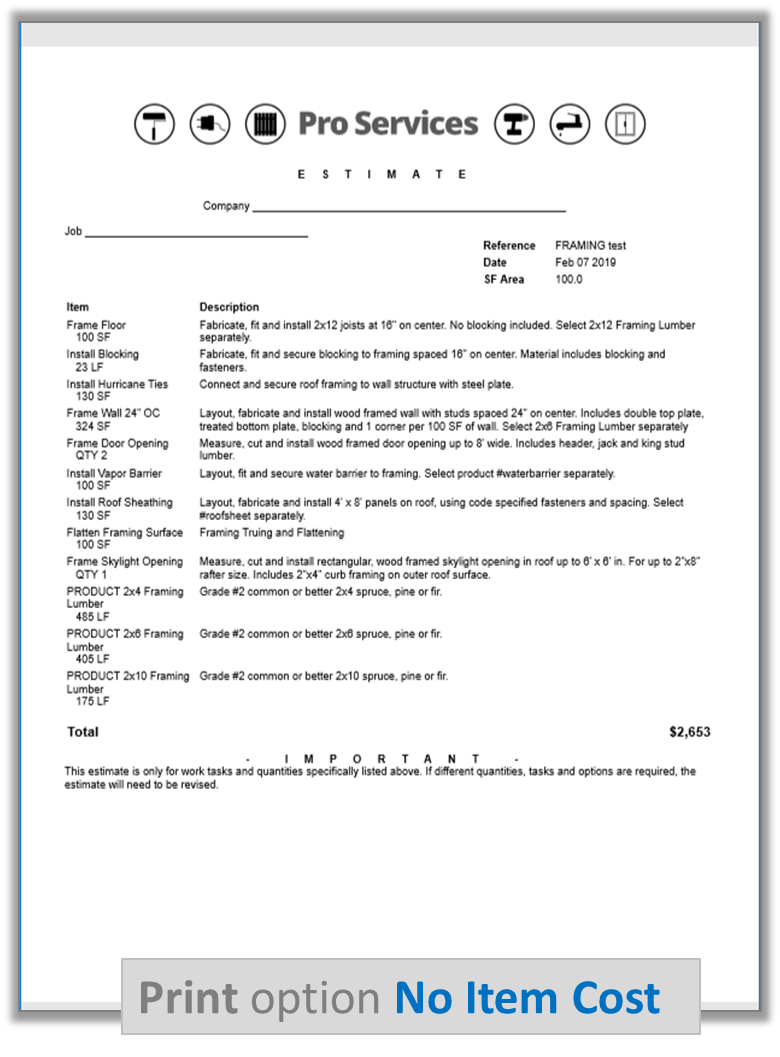
- Choose one of the following Output Format options
- Item cost detail will display hours, labor cost and material cost for each checked Item
- Item cost summary * will only display total (material + labor) cost for each checked Item
- No Item cost * will NOT display hours, labor cost and material cost for any Item in the output
Print Output Option Notes
- Remember to Save the List with selected Items before choosing Print
- * A current Pro Level Subscription is required for this feature

Create PDF output file
The best way to create and share a non-editable, electronic version of your Lists estimate is to "print" a PDF file from your Chrome (download Chrome) or Safari browser:
- Sign In to Lists open your Safari or Chrome browser and sign into homewyse Lists.
- Check the List open the List that you want to print. Verify that the List quantity and other values look reasonable to you.
- Check Items "check" the Items to be displayed in the printed output. "Uncheck" Items that you do not want included.
- Save List choose the Print button.
- [Chrome] Print choose the Chrome "Print" button.
- [Safari] Export choose "File" in the Safari menu, then select the "Export as PDF" option followed by "Save".
Create PDF output Notes
- Homewyse recommends that you use the Chrome browser because of its stability, performance and quality PDF support
- Need to install or update Chrome? Download and install Chrome now
- If you want printed List pages to contain your business contact information, your logo and any job specific notes, see the Add logo and business ID section
- To control which cost details are shown in the output, see the Print Options section.
Create CSV data export file
When you need to share, enhance or archive your Homewyse List estimating data, the csv format is an excellent option because of its compatibility with many different applications. To use the data from your Homewyse List estimate in other data analysis applications (such as Quickbooks, Microsoft Excel or Google Sheets), export the List information to a .csv file and then open the .csv file from the other application. And, for more formtting control of your estimate output file (e.g. if you want different note areas, headers, footers, graphic options or advanced pagination control) - you can simply open a .csv from Homewyse Lists from your favorite word processing application - such as Google Docs or Microsoft Word. To create a .csv file from Lists:
- Open the List open the List to export and verify that the List quantities and totals look reasonable to you
- Check Items "check" the Items to be exported and/or "uncheck" Items that you do not want to export
- Save List choose the Save button
- Choose Print > Export choose the Chrome "Print" button, followed by "Export to CSV file"
- Choose Browser Options choose options for saving or viewing the export file, as provided by your current browser application
CSV export Notes
- The .csv export file will be saved to the default download location specified for your browser
- Data exported for EACH Item: Name, Decscription, Hours Labor, Labor Cost, Material Cost
- Subtotals for Hours, Labor Cost and Material Cost are exported, along with the Total Cost
- Only "checked" Items will produce exported data
- A current Pro Level Subscription is required for this feature
Add your logo and business info
Nothing delivers a stronger impression to a prospective customer or clients than a professional estimate built around your business identity and contact information. The homewyse Lists Pro level subscription gives you this capability:
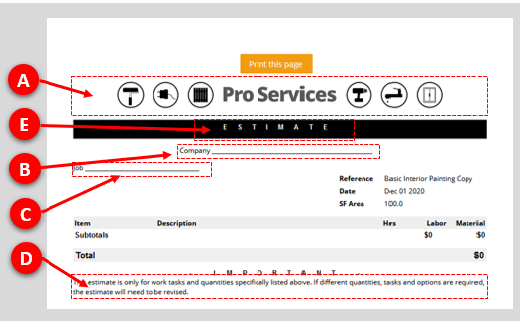
Customizable areas in homewyse Lists printed output.
- From the device you Print from... sign into homewyse Lists using the device that you will print from. If you want to create PDF output files, complete the following steps in your Chrome (download Chrome) or Safari browser.
- Open a List open any List and choose Print
- Select area to edit Note the 4 editing areas (A, B, C, D or E in the above graphic). To edit an area: choose in the area, make the change and then touch/click outside of the area to save your changes
- Logo file Make sure your logo is available as a PNG or JPEG file on each device you are printing from (or accessible from a url address). ** IMPORTANT ** Make sure your logo file has the logo size and right-to-left placement that you want - see Homewyse Lists - Adding a Logo for details. Touch/click area "A" shown in the diagram. A file dialog will appear. Specify the location of your logo file and choose open
- Contact information editing Choose area "B". It will become highlighted. Directly enter the text for your Business Name, Address, etc. Touch/click outside of area "B" to save your changes
- Document heading Choose area "E". Edit text and touch/click outside of area "E" to save your changes
- Job information Choose area "D". Edit text and touch/click outside of area "D" to save your changes
- Other notes For other information such as warranty, general disclaimers and limitations, and return information, use area "D"
Logo and Business ID Notes
- You must enter the above edits ONCE on each different device or browser that you want to print from
- Edit your logo image file (with any image editing or paint application) if you want to adjust the size and left-to-right position of your logo on the List output page; see Homewyse Lists - Adding a Logo for examples of logo sizing and placement
- Make sure that your browser has local storage turned ON; this will ensure that your logo will be reused in all future printing from that browser
- A current Pro Level Subscription is required for this feature
Combine Lists - List Import
When you want to combine separate Lists (such as for painting and trim carpentry) into a single List, one approach is to add individual Item copies from the different Lists into a main List. This Item-by-Item approach can be tedious and time consuming. The Import List feature automates the process of copying and merging entire Lists into a single step:
For example, assume the you want to combine ListA and ListB - both of which already exist in your account:
- From your List summary view, Choose Add new List
- Choose Copy YourAccountName List and then select ListA
- Give this new List a name (example ListC) and choose "Save"
- Choose Add Item(s) to this List, followed by Import List and then select ListB
- Choose either All Items or Checked Items only. The All Items option will import a copy of EVERY ListB Item into ListC. The Checked Items only option will import a copy of EACH CHECKED Item in the latest saved version of ListB into ListC.
- Optional: you can reorder Items and or remove Items to organize the new List to your satisfaction
Combine List Notes
- ListA and ListB remain unchanged when you use the above process
- This can be used with Homewyse Templates and any of your existing Lists
- This can be repeated to combine more than 2 Lists
- A current Pro Level Subscription is required for this feature
- Any imported Items with "automatically" calculated" Item quantities will be calculated using the ListC List quantity; otherwise these Items will be imported with the most recently saved fixed Item Quantity
- Items in the new List are copies - and can be fully edited without affecting the originals. Item level calculations (Item Quantity, Item Hours, Item Labor Cost, Item Material Cost) are explained in detail here
- To set a common, consistent wage for all Items in the new List, change the List wage after all merges are completed
Add a www.homewyse.com calculator to a List
The 1000+ calculators at Homewyse.com combine common options for specific installation tasks (example: Cost to Install a Quartz Countertop). Directly importing these calculators into your List will simplify List building - especially when multiple steps or subprojects are involved (for example: a job may require repair, structural modification, new material installation, and surface finishing - and you will want to include all of these in a single List). To import all the Items from a Homewyse.com calculator into your List:
- Create a new List (HIGHLY recommended) or open an existing List that will contain the calculator
- From your List summary view, Choose Add Item(s) to this List
- Choose Homewyse.com calculator from the "Copy multiple Items" section *
- Locate the Homewyse.com calculator name from the calculator list by browsing OR entering all or part of calculator description in the search box (search keyword examples: concrete, paint, frame, HVAC)
- Select the calculator name
- Complete the "Set Quantity" dialog. If you want a specific quantity, choose Fixed and then enter the quantity in the number field. If you want the quantity to be calculated as a multiple of the List quantity (whenever the quantity for the List that contains the calculator is changed), choose Calculated and enter the multiplier in the number field. Choose Add
- Optional: reorder Items and or remove Items to organize the List to your satisfaction
Add calculators Notes
- * A current Pro Level Subscription is required for this feature
- Repeat this process to add more than 2 calculators to your List
- The Items added to the List are copies - and can be fully edited without affecting the originals. Item level calculations (Item Quantity, Item Hours, Item Labor Cost, Item Material Cost) are explained in detail here
- To set a common, consistent wage for all Items in the new List, change the List wage after all merges are completed
Review and change Settings
From the main navigation area, select Account followed by Settings to access your account information and settings:
- Acount name (Username)
- Acount email
- Level
- Renewal date (for Pro Level accounts only)
- Payment method (for Pro Level accounts only)
- Card in use (for Pro Level accounts only)
- Auto renewal (for Pro Level accounts only)
- Auto save
Settings Notes
- To change Card in use, choose the pencil (edit) and enter your new Card information
- To change Auto renew or Auto save, slide the corresponding toggle control to the setting you want
- Choose Save to commit and store your changes
Getting support
If you are a new to Homewyse Lists and have questions about general capabilities and features of the app, it is very important that you first review the Getting Started materials completely. For detailed questions, review the topcis in the Homewyse Lists User Guide for relevant information. This material was created specifically to provide new users with frequently requested information - so it will provide you with the fastest and most efficient resolution to common questions.
For questions and topics not addressed in the Getting Started section or in the Lists Reference materials, send your questions to our support team. Pro level customers receive priority support - generally within one business day M-F.