
Homewyse Lists
Output and Printing
Lists Reference Output and Printing
Once you have created a List, getting professional quality printed output is just steps away:
- Open the List open the List that you want to print. Verify that the List quantity and other values look reasonable to you.
- Check Items "check" the Items to be included in the printed output. "Uncheck" Items that you do not want included.
- Save List choose the "Save" button if you have unsaved changes.
- Preview choose the "Actions" button and select a Print option. This will display a preview of the information that will be printed.
- Print Choose Print this page and your browser's print options (including print to PDF file, margin sizes, and scaling) will be displayed. Make any changes that you want and then choose "OK" to print your List.
NOTE: If you want printed List pages to contain your business contact information, your logo and any job specific notes, see the following section.
Customize the Output Page
Homewyse Lists Pro level users can modify several areas of the estimate output page, as shown below:
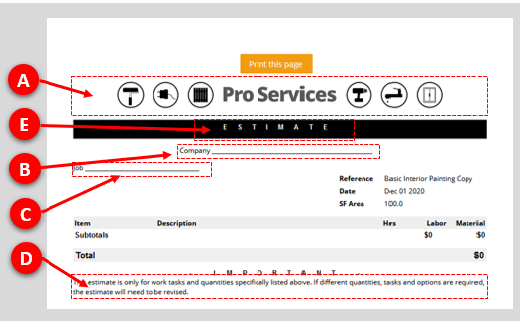
Customizable areas in homewyse Lists printed output.
- From the device you Print from... sign into homewyse Lists using the device that you will print from. If you want to create PDF output files, complete the following steps in your Chrome (download Chrome) or Safari browser.
- Open a List open any List and choose "Actions" followed by your Print selection.
- Select area (A - E in the graphic above) to edit that information. To edit an area: choose in the area, make the change and then touch/click outside of the area to save your changes.
- Logo editing Make sure your logo is available as a PNG or JPEG file on the device you are printing from (or accessible from a url address). Touch/click area "A" shown in the diagram. A file dialog will appear. Specify the location of your logo file and choose open.
- Contact information editing Choose area "B". It will become highlighted. Directly enter the text for your Business Name, Address, etc. Touch/click outside of area "B" to save your changes.
- Job information editing text and touch/click outside of area "C" to save your changes.
- General notes For other information such as warranty, general disclaimers and limitations, and return information, use area "D"
- Document header Enter your document type - ESTIMATE, INVOICE, RECEIPT, etc. in area "E"
IMPORTANT Notes
- You must enter the above edits ONCE on each different device or browser that you want to print from.
- Edit your logo image file (with any image editing or paint application) if you want to adjust the size and left-to-right position of your logo on the List output page; see Homewyse Lists - Adding a Logo for examples of logo sizing and placement.
- Make sure that your browser has local storage turned ON; this will ensure that your logo will be reused in all future printing from that browser.
- A current Homewyse Lists Pro Level Subscription is required for this feature.
Create PDF output
The best way to create and share a non-editable, electronic version of your Lists estimate is to "print" a PDF file from your Chrome (download Chrome) or Safari browser:
- Sign In to Lists open your Safari or Chrome browser and sign into homewyse Lists.
- Open List open the List that you want to print. Verify that the List quantity and other values look reasonable to you.
- Check Items "check" the Items to be included in the printed output. "Uncheck" Items that you do not want included.
- Save List choose the "Save" button.
- Print Settings choose "Actions" followed by your Print option and finally "Print this page".
- [Chrome] in the print area, choose "Save as PDF".
- [Edge] in the "Printer" drop down, choose "Print to PDF".
- [Safari] Export choose "File" in the Safari menu, then select the "Export as PDF" option followed by "Save".
NOTE: If you want print page customizations included in the PDF output file, complete the preceding steps on the same device that page changes were made on.